|
|
|
|
|
|
|
|
|
 Posted: Sat Jul 26, 2014 8:03 pm Posted: Sat Jul 26, 2014 8:03 pm
|
|
|
|
|
|
|
|
|
|
|
Posted: Sat Jul 26, 2014 8:04 pm
 |
|
|
|
|
Getting Into and Around Towns2
There are several ways to get to Towns 2, but if you have never been there before, the best way is to hover over the World tab in the menu bar just under your avatar at the top of the page and click on Towns2 link (the top link on the left).
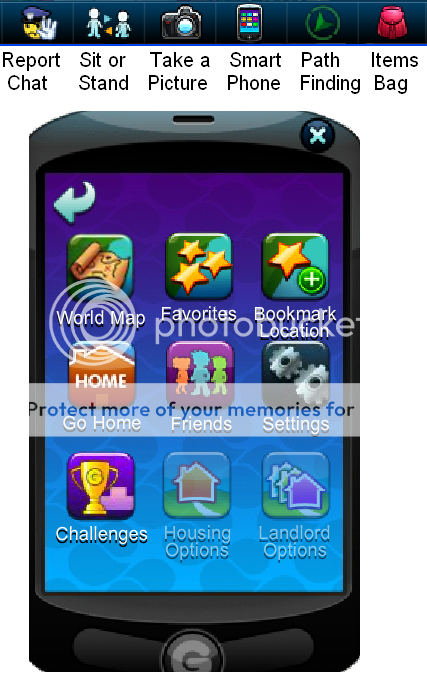 Once in Towns2, you can open your Smart Phone by clicking its icon in the menu bar along the BOTTOM right side of the window. Once in Towns2, you can open your Smart Phone by clicking its icon in the menu bar along the BOTTOM right side of the window.
Before we wander around, let's make sure our Settings are good.
Click the Settings icon (second row, last icon) and you can set Avatar Settings (I usually just increase the Walk Speed at the bottom and leave the rest checked) and Chat Settings
[ Click here to see the different fonts you can set, and also how the chat bar works. ]
Now it's time to go places. Of course, you can walk around, clicking on white arrows to go from one segment of the world to another, and just explore this big beautiful world. If you ever find a location you particularly like, you can click "Bookmark Location" and save it into your Favorites list.
Or you can go somewhere specific. Today we want to go to housing to get your house set.
So click on the World Map icon, the first icon on the Smart Phone.
[ Click here for a look at the World Map. ]
[ Click here for the World Map with all accessible locations marked. ] |
|
|
|
|
|
 |
|
|
|
|
|
|
|
|
|
|
|
|
|
|
|
|
Posted: Sat Jul 26, 2014 9:03 pm
|
|
|
|
|
|
|
|
|
|
|
Posted: Sat Jul 26, 2014 9:28 pm
|
|
|
|
|
Designing the Inside of Your House
To design the inside of your house, FIRST make sure you have bought or own all the things you want to put in it. You can put housing items in of course, but you can also put items that go on your avatar, in your aquarium, zOMG formulas, and some other items. You can use the Inventory Arranger to put things in your House storage, but it is not necessary unless the items you want to use are not housing items.
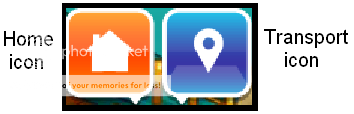
If you want a bigger house you can upgrade it for a price if you click on the home icon in the menu bar drop down from My Gaia tab.
The easiest way to get to the Homes Editor is to hover over the home icon in the menu bar for My Gaia (not the drop down menu) and click on "Design My Home."
The icons along the top left of your house let you SAVE (be sure to click that before leaving!), view objects normally, view them semi-transparently (so you can see what may be behind something), view all objects invisibly so you can see the walls and floor, and view your house with the item lights on.
The icons down the right side of your house let you add Furniture, Decor (plants, wall hangings, doors and windows), Tiles (wallpaper and floor coverings), and Misc. (stuff that could go on your avatar, in your aquarium, or other places).
Once you add an item, you must place it immediately in such a way as the outline of the item is green, not red. Some items can sit on top of shelves, tables, and refrigerators, while other items can only be set on walls (doors and windows and wall hangings) and others can only be set on the floor. Click on an item to move it, rotate it, remove it from the house (or you can cancel if you don't want to change it after all).
Don't forget to SAVE your house when you finish! |
|
|
|
|
|
|
|
|
|
|
|
|
|
|
|
|
|
|
|
|
|
|
Posted: Sat Jul 26, 2014 9:33 pm
|
|
|
|
|
|
|
|
|
|
|
Posted: Tue Jan 13, 2015 7:29 am
|
|
|
|
|
|
|
|
|
|
|
|
|
Posted: Tue Jan 13, 2015 6:43 pm
|
|
|
|
|
|
|
|
|
|
|
|
|


 If you don't want to stay there, you can walk to other near-by neighborhoods, or go back to the drop-off point and click the