|
|
|
|
|
|
|
|
|
|
|
|
|
|
|
|
|
|
 Posted: Sat Nov 10, 2012 8:30 pm Posted: Sat Nov 10, 2012 8:30 pm
 |
|
|
|
Part One: Screen RecordingThe end result of this section is basically just a recording of a large version of your selfy using the http://image2.tinierme.com/selfy.swf?account_id=5460279 URL.
So if you think you can handle that on your own, don't worry about this part of the tutorial. The end result is an AVI file that will be edited using a video editor. It doesn't have to be AVI. It can be any video format that your video editor can read.
If you already have a program to record your desktop, you're good.
If you don't have one, I can suggest this legally free one: CamStudio
Downside for many of you I imagine would be figuring out settings that will work. I had to mess with it several times to see which was the best result.
We'll go over that here.
Frame = one image of a sequence of images which make up an animation.
Frame Rate = the rate of how many frames are playing in sequence within 1 second. yum_puddi Regarding the Video Options:1. Launch the software after you have installed it. It has the tiniest little window.
2. Go to Options>Video Options. A window with settings will pop open.
3. Look at the drop down menu for Compressor. "Microsoft Video 1" was the default selection when I launched it. Now, I don't know if the codecs are based off of what you have on your PC, but the one I liked was the second option, which for me is called "Intel IYUV codec." Choose that if you have it. If you don't, it'll be a matter of trial and error.
The resulting AVI movie file of all the codec compressors I tried (except for the one that worked for me for editing purposes) all worked and looked great (in terms of play back frame rate) - buuuut when I threw them into my video editing software, the playback was jittery, horrible and all wrong, as if it were glitching on TM. Some of the other ones looked okay-ish. They just looked like they were lacking in frame rate, even though I used the same frame rate setting for them.
6. After this step, make sure you have Auto Adjust unchecked at the bottom of the window. After that, you don't have to worry about that bar at all. We don't want it.
5. So lets say you have your working codec selected. Underneath it is a bar for Quality. Boost it all the way to 100.
Under that, Set Key Frames Every 30 frames.
6. Regarding Framerates again. Capture Frames Every 30 milliseconds
Playback Rate 30 frames/second. Hit OK at the bottom of the window once you've finished these steps.
yum_puddi Regarding the Program Options:1. On the main window, go to Options>Program Options>Name of AVI File and select "Ask for file name."
That's pretty much all for that. It's better to be asked to name a file. Plus, if you made a mistake when recording, canceling the naming kind of automatically deletes the file.
Save settings on exit, and Capture translucent/layered windows should have both been on by default. It's nice to keep the settings which you like on by default every time you start the program. yum_puddi Regarding our Selfy:1. We'll be leaving CamStudio for this section. Don't click it off. Just set it to the side for now.
Now, you may want to use this URL:
http://image2.tinierme.com/selfy.swf?account_id=5460279
Some of you may be familiar with it. If you know how to use it, ignore this section up until step 4.
2. You see that 7 digit number at the very end of it? That is, this one: 5460279. That is your account's ID number...or mine in this case. Basically, that number needs to be replaced with the account number of the user who's selfy you want to use. You can find someone's account number by visiting their profile. It will be the numbers at the very end of the URL of their profile.
The URL looks like this:
http://www.tinierme.com/tinierme/mypage.do?accountId=5460279#
You only need the numbers. Not the # sign. Don't include that.
Unfortunately, you wont be able to see your own. Once upon a time, we were able to by visiting our own "Browse Outfit" page, which used to just be a button right underneath the animated selfy on our profile. That button was replaced by the "Current Outfit" button, and it was turned into a regular link on the menu of our profiles, which as you know, is grayed out when we view our own profiles, so we can't click on it. You will have to ask a friend to jump on your profile page and grab your number!
(Now, if someone knows a way around this, please let me know.)
Verruckt Engel was kind enough to point out that if you have an account with the TinierMe Trading site, if you click on Edit Profile, your account number will appear under Selfy ID.
Vance Finiraldi pointed out that if you jump on the DokiDoki IQ High School game, click on the button called View Profile, and then click on Browse Outfit. A window will appear and your ID will also be displayed in the URL.
Succbus clarified that you can also log into a mule account to see your main account's ID number.
3. Once you have your 7 digit number, paste it into the first URL in step one of this section. Viewing this new URL will pretty much look like a giant version of your selfy!
4. Keep this page opened on it's own window, enlarge it to a decent size. Something relatively big, but not as big as the entire screen. We want it to fit within the recording area.
Put that window off to the side, in a place where you wont be moving it. Don't minimize it either! This will be easier if you have more than one computer screen, cause if you want to save more than one selfy, you'll have to create an area of the screen for recording multiple times. I'll get more into that once we get to selecting a screen recording area, and then I'll probably mention why not moving this screen till you're done-done when we get to editing the movies in a movie editor.
If you only have one computer screen, and the window is covering up files, I suggest you open up a Finder/Explorer window. Doesn't matter what directory you're in. As long as you can access any directory (which you can, no matter what directory window you have open), you're fine. It may be easier to just double click on "My Computer" and just have that directory opened. yum_puddi Regarding the recorded region:1. Now, back to CamStudio. We don't want to record the entire screen...or if you're using more than one monitor, you especially do not want all of the monitors to be recorded. Waste of memory.
Go to Region>Fixed Region. A pop up window should have appeared.
2. Deselect the check on the Fixed Top-Left Corner option if it's not checked off yet. It should have been on by default, but we're not using this.
3. Drag Corners to Pan should also be deselected.
4. Now bring the window that's displaying your big selfy to front. You can still move it around at this point, but once we create the selection, you don't want to move it again until you're done working on all the selfies you wish to save during this session. If you're only working on one selfy, don't move the window until you've gotten a decent recording to work with.
5. You want to drag a rectangle that will engulf the whole selfy. Leave a bit of space on all 4 sides. We're going to crop that. We just want to make sure that we've captured all of the Selfy. It may be difficult to tell where the borders would be if you don't have a background or frame on your selfy. Just saying. Hit OK when you're done.
What I did was first use the account ID of a selfy that had a background and used it on the URL, then hit refresh. I created the selection around that selfy. Then I grabbed the ID of the selfy I was working on, which didn't have a background or borders and refreshed the page again. You don't need to re-select anything at this point.
When you've done it once, the program will remember that specific location of the screen, and it will always record just that section.
This is why it's important that you don't move the window with the selfy if you want to save more than one.
For every other selfy you want to save, you just switch out the account numbers and refresh the page without moving it. Feel free to open up new tabs to find new profile account numbers. Just don't move the window! >:U yum_puddi Regarding the actual recording:1. You may want to set up a special folder to put the recordings in. I just use my desktop, cause I can find anything on my desktop. It's also a very convenient location to find through the Finder/Explorer directory window. From the desktop, I like dragging them over to the folders I created. I like organizing project files.
2. You are now ready to hit the record button. That is the big red circle on the CamStudio main screen. Once you hit that, a border that looks just like the "screen selection" border will have appeared. Your cursor will have also changed into that knife with a cross thing again.
Hint: If you need to cancel that command and change the cursor back to normal, just right-click anywhere on the screen.
3. What you want to do is align that border with the second border, which should have appeared right over where you had made the selection in the previous section. Align it to the best of your ability, but much more importantly, make sure the whole selfy is engulfed - which is why we left some border space around the selection we had made. Once it's aligned, just left-click down.
4. The very moment you make that click, the recording will start, so be sure to move your mouse quickly away from the are that is being recorded.
5. Observe your selfy's animation. Watch how all the different animations loop. Some will loop longer than others. Get a good 3-4 loops of that long animation. Maybe just 2-3 loops will do. You don't want to leave the video recording for too long, or else you'll end up with a big file, or the file may crash.
6. Once you feel you've gotten enough loops, go back to the CamStudio main window and click on the dark-ish blue square. That's your stop button. You will immediately be prompted to name your file. You can choose where you want to save it from there too. I like saving on the desktop, then moving it over to the folder I want it to be in, as I mentioned before. I do this cause you'll get notepad files that you don't need. I like deleting straight off the Desktop. You don't have to save there though. Save wherever you want the file to end up at.
Your AVI video file will open up automatically and play when you're done saving.
That concludes this part of the tutorial!
This will probably be the longest part.
If it's TL;DR - Too bad if you can't figure it out yourself :U
If you can, good luck! =) |
 |
|
|
|
|
 |
|
|
|
|
|
|
|
|
|
|
|
|
|
|
|
|
Posted: Sat Nov 10, 2012 9:06 pm
|
|
|
 |
Part Two: Video EditingRegarding video editors - you want one that can render out a sequence of images. We want to break up the video we just recorded into a PNG sequence.
I suppose a JPG sequence works too, but PNG offers better quality. We also want to select what part of the recording we want.
If you do not have one, I would suggest downloading the 30-day trial of Adobe After Effects. BEST VIDEO EDITOR AND EFFECTS SOFTWARE. I'm a fan.
You can download it from here: Adobe.com
It may ask you to make an account, or to input an email address. I don't remember, but it's worth it. It's only 30 days, but we only have 30 days till TM shuts down, and our selfies wont be visible anymore...unless you know how to use that Japanese dream selfy site, or if you have an @Games selfy and want to save that one.
The other option I saw was to use freeware. I found one called VirtualDub, which can be downloaded from here: VirtualDub.org
I've downloaded and installed it myself. It's very safe. Downside is I don't know how to edit using it. Fortunately though, it can export the video into a PNG sequence by going to File>Export, then clicking on PNG at the bottom of the pop up window.
I'll be going over After Effects.
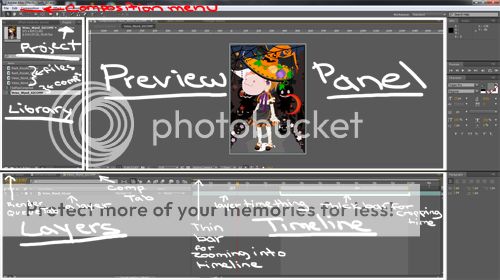 Click the image to see the large version Click the image to see the large version
yum_puddi Regarding the interface:
1. It may seem confusing at first, but it is actually muuch simpler than it looks. Just bare with me! When you first open up After Effects, a pop up box should appear that shows Recent Projects if you have any, and has several options: Open Project, New Composition, Help and Support, Browse Templates. Select New Composition.
2. Lets make sure both me and you have the same interface layout. On the very top, and on the left side, right next to the Search Help bar should be a drop down menu called "Workspace:" Select "Standard."
3. Now, on the very very most left hand side should be a panal with little tabs. The tab that is currently showing - and the only one we need is called Project. Inside of the big space underneath the portion that says "Name" is where we will drag and drop our recorded video file. Go do that now! Just drag it out of the folder it's in, and drop it over that space. This is our library. If you're familiar with Flash, it works the same way as their library. Only difference is that you need to NEVER move the files you put into the After Effects library, or else After Effects wont know where it's gone. Whereas, if that happens, you'll need to reconnect the file. Lets not go there. Too confusing. Forget I said anything regarding that. Just don't move the recorded video file from the place you stored it - which is why I suggested making a folder to organize it. This project library is where we keep all the files we'll be working with. In our case, we only need the video file we recorded.
4. At the bottom should be a long horizontal panel. There are two tabs there. One is Render Queue, and the other is (none). Select the one called (none) if it is not already selected. We'll be working with that one for now. It is split into 2 sections. The left section is where layers go. If you know photoshop or flash, you'll be familiar with layers. Same thing here. The right side is the timeline of the video.
5. Remember that video we dropped into the "Project" library area? Drag that video file into the empty space on the left side of that long panel, where the layers go.
6. Now if you look at the Project library panel again, you'll see a new file in there! It's named after the video file, but the icon looks different. That is a "Composition" file now. It itself is not a video. Instead, it holds things like videos and images that you put into the layer box. Notice that the tab which was once called "(none)" is now called the same name as the composition. You may change that name if you want by right-clicking it on the project window and selecting Rename.
7. The most obvious thing you must have noticed is that an image has now appeared in that big panel box that takes up the majority of the screen. That is the first frame of the video we recorded. It should look like your selfy. Hit space bar on your keyboard right now. It should begin to playback the video. If it does not, then perhaps you need to select the composition tab that was once called (none) where the layers are, and then hit space bar.
That's all we need to know regarding the interface. The Project library panel, the Composition panel that holds the layers and timeline, and the big giant Preview panel that shows us our video animation.
yum_puddi Regarding the editing of the video:
1. We'll be working almost entirely within the Layers panel. The video file layer should be the only layer we currently have. On the timeline - which is the part of this panel where we'll be doing stuff - you'll now see a green bar coming out of where the layer for the video is. There are 3 bars directly next to the green one, above it.You may not know that 2 of them are adjustable bars. The first bar, which is riiight next to the green bar, just right above it has 2 yellow ends. Above that one, right next to it is where the numbers are, telling you where on the timeline your video is on. Lastly, there is a much thinner bar, directly above that, which also has 2 yellow ends. The 2 with the yellow ends are the adjustable ones. You can adjust them by clicking down and dragging them left or right.
2.Make sure that the thin bar is stretched out left and right to the very extremes. This is bar is in fact what controls how zoomed into the timeline's numbers we are. The more you shrink that bar from either end, the more detail we can see regarding the timeline's numbers. For instance, instead of seeing seconds by integers of 5, we'll see the actual seconds when zoomed in.
We want to be zoomed out the most we can, so stretch it, if it's not stretched.
3. The other thicker bar we can adjust is what crops a video. Not visually, but time-wise. We want to adjust it to only play the portion of the recorded video we think looks best for a single loop.
Like the thinner bar, it can also be stretched on both ends from left to right. Just click over the yellow ends and drag it. The area of the timeline that stays within that bar is what will be played out. This is how we will be trimming our video.
If you wish to test it, make the bar small so that only a small portion of the video will play, and then hit space bar on your keyboard to play it.
What you want to do is watch the video several times until you feel a certain area has the best loop. I would suggest dragging the left yellow end so that it's at least at the 5 second marker on the timeline. In the beginning, your mouse might have been in the way, so it's a good idea to chop off the very first part. I would also suggest counting 35 seconds after that (so around the 45 second marker on the timeline), and drag the right-end of the bar there, so that now the video portion that will play is 35 seconds long. Use this as a starting point.
If you feel that this length of time is good, but would prefer to move the selection more forward into the timeline, you can click down on the grey (not yellow ends) part of the bar and drag it forward. You can also drag it backwards of course. I just want you to know that you can do this, and still preserve the length of time you established with the bar.
The longest length I've used for the 4 only gifs I've made for selfies is I think about 40 seconds. Try not make the length of time to long so that the file size of the final image wont be too big. Remember - you just want one good-enough loop.
Remember also that the more animated items the selfy has, the harder it is to find a decent loop. You may not find a perfect one, so just try your best.
yum_puddi Regarding the cropping of the image:
1: You probably ended up with some extra space on all 4 borders of the video you recorded. Especially since I asked you to for the sake of making sure the whole selfy was recorded, and not cut off. We want to remove those borders. Unfortunately, there is no conventional way of actually using a crop tool to chop off some pixels, like in Photoshop and other image editing software. What we can do is change the size of the composition's resolution.
Go to Composition>Composition settings on the main menu at the top, or press CTRL+K on your keyboard and the Comp Settings window will pop up.
2. Width and Height is what you want. The only numbers that should be in yellow. Right now, the current numbers reflect the size of the video we recorded. You will have to estimate more or less how many extra pixels you have on the left + right side together, and how many you have extra on the top + bottom together. Take the current numbers, and subtract them by your estimation. Don't be afraid of chopping off too much. The image will still be whole. Think of the resolution size as a window we are seeing through. Not a canvas we're cutting up.
Make sure the check box for Lock Aspect Ratio, which is right next to the width and height, on their right is checked OFF.
As you make your changes, you will automatically see them in the preview panel. Adjust them till you think you may have removed enough pixels on all sides. Hit OK when you are done. You will probably need to drag the image around a little bit to match the corners. That's the next step. You may want to resize again after that, but you should have a much better idea about the pixels - much removing a pixel or a few pixels might affect it. It's a bit of trial and error.
3. To drag the image, go to the layers panel and select the only layer that should be in there. When you select it, you should take now that 8 nodes have popped up around the border of your image. Even if the size of the composition window is smaller than the image, the image's actual border size will be highlighted. While the layer is selected, use the arrow keys on your keyboard to move the image, and align it to the top-left corner. Quickly tap the arrow keys in one direction once. You'll notice that the image moved by just a little bit. Keep tapping it in short bursts like that. It will make your alignment more accurate. Look carefully on the borders to make sure the borders are aligned well enough. If you have to, tap the arrow key in the opposite direction just once, and the once again in the right direction to see if there's a change of color between the selfy's border and the extra space. If that didn't make sense to you, then ignore that, and just do your best to align it. It's just a method I use on After Effects, Photoshop and Ilustrator when I'm aligning images.
4. Now that your image is at the top-left corner, you can visually see how much space is either left over that needs to be removed, or missing. Resize if necessary. Again, CTRL+K is the shortcut to open up the composition settings menu.
yum_puddi Regarding the rendering of the video:
1. I swear, we're almost done with After Effects! I hope it hasn't been to difficult to understand this so far. I'll have a screen shot of the interface posted, with the different sections highlighted for some visual help. Right now though, I'll ask that you open up the composition settings once last time. CTRL+K for the shortcut. The settings for Frame Rate, change it to 12. That means you'll only end up with 12 images for every second. It may have been 30 at default, since that's what the video recording was. 30 whole individual images for every second in our video is a lot to render out. That's also a lot of images to end up with. So we're cutting that down to 12. In terms of quality, for this sort of thing, it really wont make a difference. Hit OK when you've made the change.
2. Go to Composition>Add to Render Queue. When you do this, the layer/timeline composition panel will have disappeared, and instead, you'll find yourself on the Render Queue tab. The composition tab is right next to it, and clicking on it will bring back the layers/timeline. We don't need that now though. We want to render out our video into a PNG image sequence.
3. You'll notice that on this Render Queue, there's some babbly, maybe confusing information. This is a queue. There should only be one. I want you to click on the yellow words that say Lossless. This is your Output Module. That means, these are the settings that will determine what kind of file the video will become. A window will pop up.
Touch nothing except the following:
Format - on the drop down menu, select PNG Sequence. It's all in alphabetical order, so look for P.
Check box Resize - check it! What was once grayed out is now not grayed out and editable!
From the new settings which we can now edit, I want you to make sure that the check box called Lock Aspect Ratio is checked.
There should be 2 yellow numbers there too for the setting called "Resize to:" Make the second number (Height) be 200, then hit OK at the bottom, or hit Enter on your keyboard.
4. Now, I want you to look at the yellow numbers/letters/name next to the setting that says Output to:, which is on the right side of Output Module. Here is where we select a destination for where the images will be saved, as well as give a name to the images. Do not be hasty when the pop up box opens. Let it open, and before touching the name, I want you to unhighlight the name, if it is all highlighted. I want you to highlight the portion of the name that comes before the [#####whatever###] brackets. I also suggest keeping the underscore "_" that comes before it. Put the name in front of that underscore. Leave the rest the same. The point of an image sequence is that they all bare the same name, but have unique numbers, which go according to what frame they belong to in the video. The result of the name should look something like: mySelfyRenders_[#####].
I strongly suggest dedicating a whole folder for this render. Create a new folder, and call it something like Selfy Renders. Select it and hit Save.
5. You should be set. A fair warning. Rendering in general is usually pretty heavy on the computer's RAM and processing power. If your computer isn't particularly strong, I suggest not doing anything else on it. If you can, do what I do and pick up your gameboy or sketchbook. The more frames, the longer it will take. On my computer, after it was already constipated from some other heavy duty stuff I was doing on it, it took about maybe 3 minutes to render out about 500 frames (aka 500 images). You can delete these btw, once you are finally done creating your gif.
Hit the Render button located on the top-right side of that Render Queue panel. It's a long, thin rectangular button. The progress bar is that very very thin dark grey bar, which should actually now have a bit of yellow filling it up on the right side. If you have your volume turned on, once the rendering is done, it will make a loud charming ding sound effect to let you know. If the volume is off, just observe the bar. It'll disappear when it's done.
That concludes everything we need from after effects. |
|
|
|
|
|
|
|
|
|
|
|
|
|
|
|
|
|
|
|
|
Posted: Sun Nov 11, 2012 1:35 am
|
|
|
|
Part Three: Creating the GIFPerhaps some of you already have your favorite gif-making software. You have your image sequence ready. The one I use though is Adobe Photoshop.
Again, you can download the 30-day trial from Adobe.com.
This section shouldn't take too long.
yum_puddi Regarding the importing of an image sequence:
1. When you have the software downloaded and opened, go to File>Open. Look for the very first image of the PNG sequence we've rendered. Select just that first one. Don't hit Open yet. Near the very bottom of the window should be a single check box called Image Sequence. Check it! Now you may click on Open.
2.You should get a pop up showing you the Frame Rate. Choose Custom for the drop down menu, and input 12 for the fps. Hit OK.
If you by any chance get a small pop up box saying "Pixel aspect ratio correction is for preview purposes only..." just hit OK. It's irrelevant for us.
yum_puddi Regarding how to save the GIF:
1. All you need to do now is go to File>Save for Web & Devices. A window will open up again. It may take a couple of seconds for everything to load.
2. When it's done loading up and the image of the GIF shows up in the preview box, adjust the settings accordingly:
Leave Preset be as it is. It probably says [Unnamed]. We're not using this.
For the drop down menu right under it though, select GIF. By default, it may have been on PNG-24 or something.
For the drop down menu right under that one, choose Selective.
For the drop down menu under that, make sure it says Diffusion.
Transparency check mark should be on.
The drop down menu under that check box should say No Transparency Dither.
Under that is another check mark, called Interlaced. Do not check that. Make sure it's unchecked.
Color: 256
Dither: 0% <-- after making it 0, be prepared to have to wait for the preview image to reload. It may take several seconds. This is what's going to make this GIF's file size bigger than most GIFs of such small resolution. It will also make the fugly grainy stuff in the coloring go away. =3
Matte: should be blank.
Amount is also blank.
Amount is blank.
Web snap is at 0%
Lossy is at 0.
There should be a check mark under that section called Convert to sRGB. This should be checked.
Preview: Monitor Color
Metadata: Copyright and Contact Info
Don't worry about that Color Table. Ignore it.
Under that color table is the Image Size options.
Width and Height should be left as they are.
Percent: 100%
Quality: Bicubic
Animation settings are under that
For the Looping Options drop down menu, select "Forever" so it keeps on looping.
After this, you're done! Hit Save, choose the file location, name it, then hit Save again!
If you were successful, congratulations! If you had problems, feel free to ask questions here. I'll be revising my wording and try to make things clearer. |
|
|
|
|
|
|
|
|
|
|
|
|
|
|
|
|
|
|
|
|
|
|
|
|
|
|
|
|
|
|
|
Posted: Sun Nov 11, 2012 1:41 am
|
|
|
|
|
|
|
|
|
|
|
|
|
Posted: Sun Nov 11, 2012 1:44 am
|
|
|
|
|
|
|
|
|
|
|
|
|