|
|
|
|
|
|
|
|
|
|
|
|
|
|
|
|
|
|
 Posted: Tue Mar 28, 2006 7:47 am Posted: Tue Mar 28, 2006 7:47 am
 |
|
|
|

Gaia Fishing was the first Mini Game released in Gaia back in late 2004. You must use your skills and reflexes to outwit those poor fish that just happen to bite onto your rod! It takes alot of effort to be could with this game, and it is the only game, in my opinion, not based solely on luck.
How to Play:
To start, you will need to buy a rod and some bait. Old Man Logan will assist you in this matter in his shop. There you can buy both your bait and rod, aswell as see the top fisherman for this month - More information about this later on.
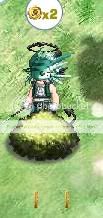
Now about the game itself. There are three different lakes for you to choose, each with it's own level of difficulty. Starting with Bass'ken Lake(easiest), then Port of Gambino, and finally Durem Reclamation Facility(hardest.) Beginners should start in Bass'ken Lake, unless you are willing to spend alot of time losing fish - which can be quite frustrating. We don't want you to lose interest! Then as you get better, move onto Gambino, then to Durem Reclamtaion!
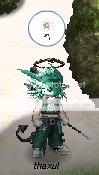
To catch the fish, you must keep it within the red lines. The line shapes varies from each rod, so choosing your rod is important if you want to become a top fisherman.

Pull your rod in the opposite direction of the fish to keep it in the lines, as you can see above. If you manage to keep the fish in the lines all the way down the screen, it will be moved to your bucket. If not, you have lost the fish, and will have to try again. This is where all your fish is stored until you Save and Quit the game, or move onto your next bait. Now onto the materials needed.
Bait There are three different types of Fish Bait, as you progress as a fisher, move onto the next bait. One bag of bait=One bucket. Not one cast.  Grade F Fish Bait The Package Reads: "This fish bait is rated Grade F - Not Fit For Human Consumption - Suitable for fish and other marine wildlife" Hey, Better than nothing.Price: 25gold The cheapest bait available. Beginner fishermen should use this.  Grade D Fish Bait The Package Reads: "This bait is rated Grade D - Fit For Human Consumption - Suitable for fish and other marine wildlife." A step up from Grade F, I'm pretty sure I'll have better chances at catching better fish using this stuff.Price: 100gold If you feel you are progressing, and want the chance to catch better fish than with Grade F bait, use this.  Grade A Fish Bait Tha Package Reads: "This bait is rated Grade A - A delicay to any species in or out of water." OMG, with this bait I'll have MUCH better chances of scoring better fish all the time."
Price: 250gold
This is the most expensive bait available. You must be skilled to take advantage of this bait, otherwise you will lose most of the rarer fish that bite onto your rod.
~~~~~~~~~~~
Rods Four rods are available at this time. You can upgrade any rod with the added cost of 10,000 gold. The upgrade widens the lines in the game that you must keep the fish in.  Basic Rod  Basic Rod Plus A basic wooden fishing rod. Small and sturdy, this rod is an essential start to any fisherman.Price: 100gold Upgrade Cost: 10,000gold This is the rod that most users start out with, being also the cheapest. It is harder to catch bigger fish with this, as the lines are straight and narrow.  Strength Rod Strength Rod Plus A heavy weight, inflexible rod designed for upclose battles. As such this rod cannot cast as far as other rods in its class. This rod provides superior control at shorter distances, but offers less control at longer distances.Price: 1,850gold Upgrade Cost: 11,075 gold The red lines widen at the bottom, but remain the same width as a Basic Rod at the top. Very helpful if you find the last fight difficult.  Performance Rod Performance Rod Plus An all around performing rod. This rod provides great control at far and short distances, but less control at midrange pulls.Price: 2,475 gold Upgrade Cost: 12,500gold The lines of this rod are wider than the basic at both the top, and the bottom. But in the middle, it becomes extremely narrow.  Distance Rod Distance Rod PLUS A slender, flexible rod built for distance casting. This rod provides superior control at longer distances but offers less control on close pullsPrice: 3,500gold Upgrade Cost: 13,050gold The opposite to a Strength rod, the lines widen at the top, but remain narrow at the bottom. Casts much further out than the Strength rod.
~~~~~~~~~~~
Monthly Contests Each month, Gaia fishing awards trophies to the top 10 fishermen in each lake, aswell as the 'Overall Top Fisher in Gaia' and a trophy for the 10 fishers with the most junk. Gold trophies are awarded to the top fisher in each area, Silver trophies are awarded to the 2nd best fishers in each area, and Bronze trophies are awarded to those who come in 3rd - 10th place in each area. Durem Reclamation Facility Trophies Overall Top Fisher of Gaia Trophy  Gold GAIA Fishing Trophy Gold GAIA Fishing Trophy |
 |
|
|
|
|
 |
|
|
|
|
Sofisticated Newb Captain
|
|
|
|
|
|
|
|
|
|
Sofisticated Newb Captain
|
Posted: Tue Mar 28, 2006 7:48 am
|
|
|
 |

In the Gaia Casino, there are currently two games available to play; Slots, and Blackjack. Both can be accessed through Gold Mountain Casino, or through the header under the 'Games' tab. I'll teach you the basics of how to play each game.
**Before playing each game, make sure you have Tokens. These can be bought in the Gold Mountain.
Token Slots
This is the first of Gaia's gambling games, and it is solely based on luck. The aim of the game is to get three of any one of the symbols. This will result in a payout of tickets, which can be used to trade for items in the Prize & Joy.
When the game is opened you choose either 'Single Player Mode' or 'Multiplayer Mode'. The Single Player screen looks like this:
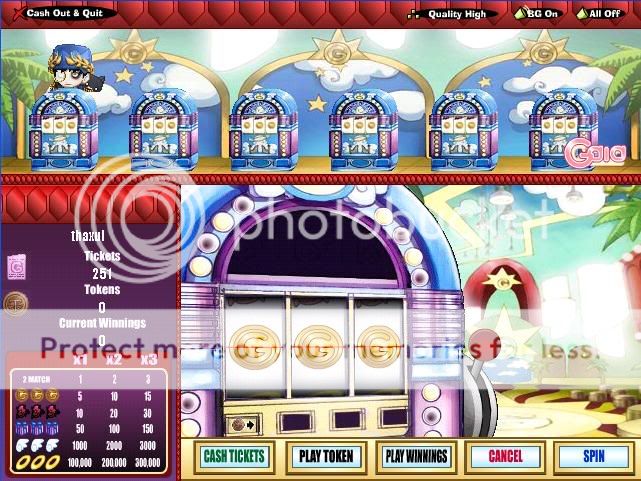
The Multiplayer screen is the same, except on the bottom there is a chat room. It's a pretty basic game, and doesn't need much explaining. EVerything is clearly visible from the screenshot, but I'll outline it for you anyway.
On the top you can see the user. In multiplayer mode, each room can fit up to six users, and each user gets their own slot machine at the top.
On the left, you can see the amount of tickets, tokens and winnings you have.
Below that, you will see a key to the symbols and winnings.
In the center of the screenshot, you can see the slot machine, and the buttons below it. This is the key to the game.
How To Play
Now the basics of gameplay. You play your tokens by clicking the 'Play Token' button. You may play up to 3 tokens per win. The more tokens you play, the more you can win.
As can be seen from the screenshot above, there are four different symbols, each worth more should you get three of them in a row. With each '2 Match', you get back whatever you bet. E.G; You bet two tokens, you get two tickets back.
The symbols are:
Gaia Coin -This is worth the least if you get three in a row. Very common.
Bet 1 Token - Get 5 Tickets back.
Bet 2 Tokens - Get 10 Tickets back.
Bet 3 Tokens - Get 15 Tickets back.
Little Devil - The second lowest symbol. Fairly common.
Bet 1 Token - Get 10 Tickets back.
Bet 2 Tokens - Get 20 Tickets back.
Bet 3 Tokens - Get 30 Tickets back.
Present Box - The middle symbol. Neither rare or common.
Bet 1 Token - Get 50 Tickets back.
Bet 2 Tokens - Get 100 Tickets back.
Bet 3 Tokens - Get 150 Tickets back.
Angelic Wing - A fairly generous symbol. Uncommon.
Bet 1 Token - Get 1,000 Tickets back.
Bet 2 Tokens - Get 2,000 Tickets back.
Get 3 Tokens - Get 3,000 Tickets back.
Halo - The rarest symbol in Gaia slots. Extremely rare.
Bet 1 Token - Get 100,000 Tickets back.
Bet 2 Tokens - Get 200,000 Tickets back.
Bet 3 Tokens - Get 300,000 Tickets back.
As you can see, there is quite a difference between the bottom three symbols and the top two. Consider yourself extremely lucky if you get 3 Haloes.
Now I know what you're asking; Now that you have all these tickets, what can you do with them?
Well, you trade them in for items at the Prize & Joy, as stated above. Or you could sell them to other users via the Bank or Marketplace.
~~~~~~~~
Gaia Cards
This is the newer casino game, and requires a bit of skill to play. It's located in the Gold Mountain also.
When you click into the game, you are given a list of user created rooms. Choose one that isn't full - each room holds up to 6 players, and then you are greeted with this screen:

On the top, you can see other players in the room.
Along the left, you can see the amount of tickets, tokens and winnings you have. Along with the buttons 'Cash Tickets', 'Reset Game', 'Play Token', 'Play Winnings' and 'Deal'. he uses of these buttons are fairly obvious.
In the center, you can see who you are playing against.
On the table, you can see words in white. 'Hit', 'Stand', 'Double Down'. What they mean:
Hit - Click this button when you want a card dealt to you.
Stand - If you feel that it isn't safe to have another card, or you want to end your turn, click this.
Double Down - This is only available as an option once right after you are dealt your first two cards. If you have enough tokens and/or winnings, the current bet will be doubled (always takes from tokens first, if any) and you will be dealt only one more card. After you are delt your third and final card, the game continues normally with the dealer turn. If you win the hand, you will double your winnings. If you lose, you will have lost twice your initial bet.
And beside these buttons, is where your cards are dealt.
How To Play
The aim of the game is to beat the dealer. Each player, you and the dealer, starts off with two cards. You see both of your cards, and only one of the dealers. After the initial cards are dealt, you can ask to be dealt any number of cards. When your turn is over, the dealer has the choice of drawing cards.
The player who has the hand closest to 21 wins. If you go over this when asking for cards to be dealt, you lose. Should the dealer excede 21, you win. Each number card equals their value. E.G; 3 of hearts=3. Each face card equals 10. E.G. King, Queen and Jack cards=10. Aces equal either 1 or 11. This changes automatically during the game based on the situation.
When there is a tie, it results in a 'Push'. All bets stay on the table, and carry over to the next deal.
I can cheat!?
Cheat gives you a slight advantage. As you play a small meter below your name will rise. When this reaches maximum, you will be able to use your special power, Cheat. This allows you to see the unturned card of the dealer so you can decide on your tactics based on this.
But, you are not alone with your special power. Each dealer has their own special power.
The life bar beside your name is a representation of the percentage of tokens+winnings you have in relation to the amount of tokens you started the current game with. When the life bar of the dealer goes down to the end, they will be replaced with another, better skilled dealer. And you will be granted a small award of Tickets.
~~~~~~~~~ |
|
|
|
|
|
|
|
|
|
|
|
|
|
|
|
|
|
|
|
|
Posted: Tue Mar 28, 2006 7:49 am
|
|
|
|

Gaia Towns is a virtual Hangout where you can have your own Home, talk to other people, catch bugs, shake trees for gold, collect trash and pick flowers. You can get to it by clicking on the Train Station in Barton on the World Map, or by going to Games -> Towns at the top of the screen. When you arrive into Towns, you are greeted by the NPC Ian. He welcomes to the neighbourhood and introduces the other NPCs in the screen. They each have something to teach you if you are new to gaia Towns, so click on each of them and read what they have to say!
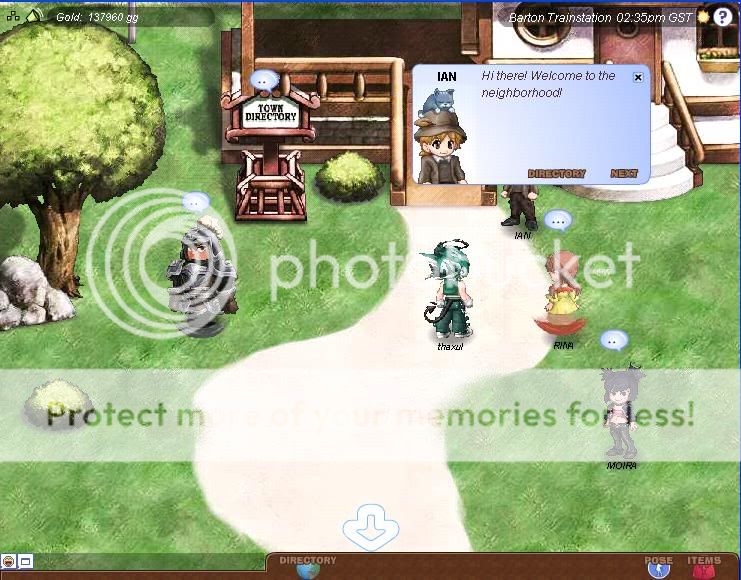
Ok, now you're wondering how to go and talk to other people, right? Just head down to the bottom of the Train Station to the arrow bly click on the screen where you want your character to move to, or click the Directory Globe at the bottom of the screen to get to the Directory. This will be bring you to the directory, which should look like this.
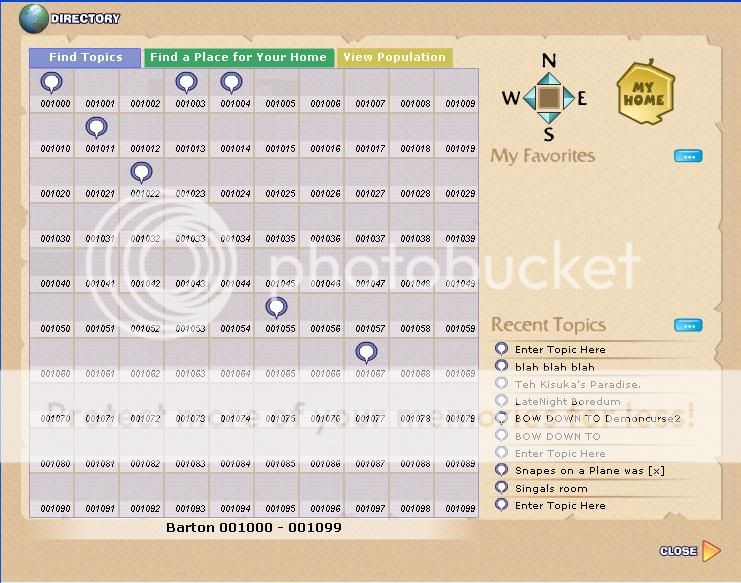
Each purple square represents a different neighbourhood, which includes 9 other squares. 8 of which have other peoples Gaia Homes, and one Town Square. If you want to be directly transported to your Gaia Home, click the 'Your Home' button(If you do not have one, I will provide information on this near the end of this post.) The Navigation arrows lead you to other areas of Barton, where more Homes are placed. Click any of them and choose your destination when you're ready. This is what you'll get:
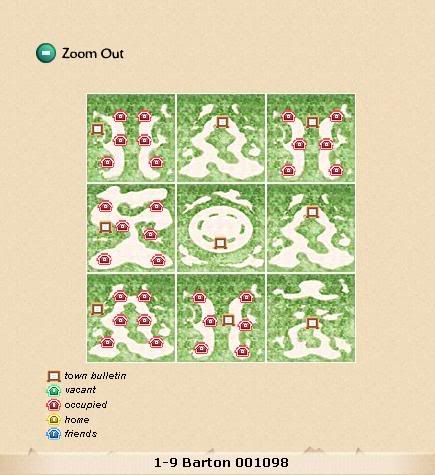
it's pretty self explanatory. From here simply click on the NOtice Board like image in any aquare and select "Enter STown", and your Gaia Towns experience begins!
From here you can visit other homes, pick up the trash, shake trees, bushes and rocks for gold or catch bugs, and even just sit and relax while talking to your friends! Every piece of trash, bug and flowers go to your Item Backpack which can be seen in the bottom corner. Click that to see what you have picked up! And then click the robot to send those items to your inventory.
How to get your Own Gaia Home
Getting your Home on Gaia is easy and free! Just head over to the Aekea Housing Commision and the NPC Josie will help you get started! Click the 'HOmes; Get your Home here' button and choose which type you want. Whatever you pick, it will be free for your first Home!
When you have your Home, you can buy furniture and Decorations for it in The Faktori, which is managed by Three Robots. When you have your decorations and furniture, go to My Gaia -> My Stuff -> Organise My Inventory and place the furniture into your suitcase. Save, and then click 'Arrange my Home'.
If you would like more room in your Home, head back over to thr Housing Commision and purchase an Upgrade for 20k.
How Do I Place my Home in Gaia Towns?
Head back over to the Aekea Housing Commision, and purchase a Town Permit(Don't worry, it's free!). Open up Gaia Towns Directory and click the Tab for 'Find a Place for My Home'. This shows how many vacancies there are in each neighbourhood with a number in each square. If there is no number in the square, then there are no vacancies! Simply click the navigation arrows until you find a neighbourhood with vacancies and move in! |
|
|
|
|
|
|
|
|
|
|
Sofisticated Newb Captain
|
|
|
|
|
|
|
|
|
|
Sofisticated Newb Captain
|
Posted: Tue Mar 28, 2006 7:52 am
|
|
|
|
|
|
|
|
|
|
|
Posted: Tue Mar 28, 2006 7:52 am
|
|
|
|

Tickets won from the Slots/Cards can be exchanged for items in the Prize & Joy shop, located on the Isle of Gambino.
Casino Items
  
n_n Glasses | u_u Glasses | O_O Glasses |
  
.-_.- Glasses | X_x Glasses | ._. Glasses
  
-_- Glasses | >_< Glasses | Heart Glasses
 
Smile Glasses | Swirl Glasses
Ticket Cost: 3,500

The Mole
Ticket Cost: 6,000

Card Shark Bands
Ticket Cost: 6,000
  
Purple/Red/Yellow JACKtASS
Ticket Cost: 7000
  
Purple/Red/Yellow JACKsASSh
Ticket Cost: 7,500
  
Purple/Red/Yellow JACKhAtSS
Ticket Cost: 9,000

Card Shark Bands
Ticket Cost: 8,500

Card Shark Visor
Ticket Cost: 9,500

The Moustache
Ticket Cost: 10,000

Coin Changer
Ticket Cost: 12,500

Courted Ruff
Ticket Cost: 12,500

Long Drag
Ticket Cost: 13,000
  
Joker Wand Red-Black/Yellow-Blue/White-Black
Ticket Cost: 13,000
  
Joker Collar Red-Black/Yellow-Blue/White-Black
Ticket Cost: 27,500
  
Joker Hat Red-Black/Yellow-Blue/White-Black
Ticket Cost: 55,000
  
Parisian Blue/Red/Yellow Fan
Ticket Cost: 20,000

Kings Beard
Ticket Cost: 30,000

Courted Wig
Ticket Cost: 42,000

Parisian Wig
Ticket Cost: 42,000

Phantom Death Masque
Ticket Cost: 50,000
  
The Family Jewels Silver/Onyx/Gold
Ticket Cost: 50,000 | 53,000 | 56,000
  
Royal Scepter Silver/Onyx/Gold
Ticket Cost: 90,000 | 100,000 | 110,000
  
Royal Cloak Blue/Red/Black
Ticket Cost: 150,000 | 160,000 | 170,000
  
Royal Crown Blue/Black/Red
Ticket Cost: 300,000 | 315,000 | 330,000 |
|
|
|
|
|
|
|
|
|
|
Sofisticated Newb Captain
|
|
|
|
|
|
|
|
|
|
Sofisticated Newb Captain
|
Posted: Tue Mar 28, 2006 7:54 am
|
|
|
|

In this post, now that you've caught all the bugs, trash and flowers you can handle, you'll find out what you can do with them.
Bug Exchange Trading in bugs gives you Ink, which you can use to colour your bouquets and ribbons with flowers. To exchange bugs for gold, go to the Bug Exchange in Durem Depot. Moira will take all those pesky bugs off your hands and give you colourful ink! 50 bugs of a certain colour=One pot of ink. This means if you have 50 Blue Butterflies, you can make one pot of Blue Ink.. Or you can mix and match; 20 Blue Butterflies+30 Blue Fireflies also makes one pot of Blue Ink. The bugs have to be the same colour for you to trade. And this excludes the rare bugs. Rare Bug:Ink List: Great Monarch Great Monarch x1: 1 Orange Ink, 1 White Ink, 1 Black Ink.  Golden Legs Golden Legs x1: 1 Gold Ink, 1 yellow ink, 1 green ink.  The Whistler The Whistler x1: 1 yellow ink, 1 black ink.  Demonfly Demonfly x1: 1 black ink, 1 red ink.  Rhino Beetle Rhino Beetle x1: 1 brown ink, 1 black ink.  Purple Fly Purple Fly x1: 1 red ink, 1 purple ink. Ink Mixing List Gold Ink: Gold Ink: Yellow Ink x1 + White Ink x1 = Gold Ink x1  Purple Ink: Purple Ink: Blue Ink x5 + Red Ink x5 = Purple Ink x1  Orange Ink: Orange Ink: Red Ink x5 + Yellow Ink x5 = Orange Ink x1  White Ink: White Ink: Red Ink x5 + Blue Ink x5 + Green Ink x5 = White Ink x1  Pink Ink: Pink Ink: Red Ink x5 + White Ink x1 = Pink Ink x1  Green Ink: Green Ink: Yellow Ink x1 + Blue Ink x1 = Green Ink x1 -or- Yellow Ink x5 = Green Ink x1  Brown Ink: Brown Ink: Red Ink x1 + Green Ink x1 = Brown Ink x1 -or- Green Ink x5 = Brown Ink x1
Trash Exchange As you walk through towns you will notice alot of trash left around the place. You can trade these pieces of trash for special items. You can trade the pieces of trash at the Trash Exchange located in Gambino Hat Rack. Peyo will help you there. Newsprint/NewspaperCrumpled Newspapers x50 Makes: Newspaper Combover  ------>  Old Crumpled Newspaper Old Crumpled Newspaper x50 makes Old Newspaper Combover ------>  Dirty Crumpled Newspaper Dirty Crumpled Newspaper x50 makes Dirty Newspaper Combover ------>  Newsprint Newsprint x50 makes Newsprint Fro------------ x100 makes Newspring Stars ------>  ------ ------ ------>  Construction PaperComes in three colours: Blue, Green, Red.Construction Paper Construction PaperComes in three colours: Blue, Green, Red.Construction Paper x75 makes Crown--------------------- x100 makes Spiky Hat ------->  ------ ------ ------->  Xerox PaperComes in three colours; White, Orange, BlueXerox Paper Xerox PaperComes in three colours; White, Orange, BlueXerox Paper x50 makes Headband------------ x75 makes Shade Hat------------ x100 makes Cat Band -------->  ------ ------ -------->  ------ ------ -------->  Paperbags:Paperbag Paperbags:Paperbag x50 makes Cap----------- x100 makes Hoodie -------->  ------ ------ -------->  |
|
|
|
|
|
|
|
|
|
|
|
|
|
|
|
|
|
|
|
|
Posted: Tue Mar 28, 2006 7:55 am
|
Sofisticated Newb Captain
|
|
|
|
|
|
|
|
|
|
Sofisticated Newb Captain
|
Posted: Tue Mar 28, 2006 7:56 am
|
|
|
|
|
|
|
|
|
|
|
Posted: Tue Mar 28, 2006 7:59 am
|
Sofisticated Newb Captain
|
|
|
|
|
|
|
|
|
|
Sofisticated Newb Captain
|
Posted: Tue Mar 28, 2006 7:59 am
|
|
|
|
|
|
|
|
|
|
|
Posted: Tue Mar 28, 2006 8:00 am
|
Sofisticated Newb Captain
|
|
|
|
|
|
|
|
|
|
Sofisticated Newb Captain
|
Posted: Tue Mar 28, 2006 8:01 am
|
|
|
|
|
|
|
|
|
|
|
Posted: Tue Mar 28, 2006 8:02 am
|
Sofisticated Newb Captain
|
|
|
|
|
|
|
|
|
|
Sofisticated Newb Captain
|
Posted: Tue Mar 28, 2006 8:03 am
|
|
|
|
|
|
|
|
|
|
|
|
|


 [imghttp://graphics.gaiaonline.com/images/thumbnails/3e77c777a25.png[/img]