

Alright I'm getting tired of people who can't do smEB, so I'm going to make my own guide.
Please note that I only did smeb 4 times after the update, so my knowledge on this is pretty lame.
Now the aim of smEB is just the same as sEB, its to be fast. Now there have been several attempts at trying to get it done, but they simply aren't done well enough.
We all know that mobbing in SS and Ledge are a breeze to mob, the only suggestion I'll give is to mob at neck rather than at tail. Why? The tighter the spot, the more effective our AoE rings are. You guys need to learn to be capitalist with your rings.
But with this there is a slight problem, those who try to lure the fluffs to neck may leave behind about 3 fluffs, so I recall. So the person luring must make sure all the fluffs are lured and time isn't wasted trying to attack them.
I'm not sure, but I think you have to kill about 60 animated to lower queens CL, I'm still not sure about this, but that's my estimate
Also if you dare to skip Tobos, please for god sake mob at least 3 screens before going, it makes the trip a bit more safer. Why? Because fleets tends to run out 3 screens before you reach the exit according to my experience.
Anyways when you all make your way to Sealab Compound, I think we can all agree that EB door should be mobbed first. It is the hardest and longest mob to kill. I advise you guys to kill the labtechs, then cycles and then move onto jumpers. There is no point trying to go after jumpers straight since everyone will be hitting and locking onto different enemies. Also you'd be wasting precious stamina.
IMPORTANT: Please make sure you buff up here. It is a lengthy switch to clear, so it is wise to buff up here than in any other area.
Everyone
1st Lurer
2nd Lurer
Always have the 1st lurer go first, they'll take most of the hits from the animated and they'll quickly rejoin with the pack so they could be easily healed. 2nd lurer should lure the rest and group with the others.
Kisame Tip: Have one person in crew to have hot foot. Now when at EB door, you will see that once a majority of the mob has died, the jumpers will be the last survivors. This a moment where everyone is confused and you guys end up hitting different Jumpers. Now my tip is hit the jumpers you guys see the person with hot foot is hitting. This speeds up the killing process and is more organised.
Now after the mob is killed, head to 1st and 2nd switch, spilt the crew up into two. The reason for this is so you can clear the area in one go and then quickly progress to the 3rd switch.
The Green line represents Crew 1, which is essentially a 3 man crew
As you can see above the green line shows where the 1st crew should go to lure the animated. Once luring is done, I advise you to stay at that bottom right hand corner spot. Why? Well its to compress the mob down, so it is easier to mob. Before in my sEB runs I'd make the person who's doing 1st switch dialogue to stand at that spot, since they'd be safe from getting hit from any retreating animated. That spot is a excellent way to mob the animated and I really advise you guys to stay there.

As you can guess the blue line represents the direction the 2nd crew should follow the lure. One person should lure from the area circled and then station at the corner screen, the blue dot. While waiting there the other crew mates should lure the animated surrounding the 2nd switch area and bring them into the corner area.
You'd probably know why I'm asking you to stay at the corner. Some mobbers tend to have their mobs spread out, but I'm a player who plays through efficiency, I could be described as being a efficient mobber. I want to get the mob down fast, while making sure my AoE rings are fully maximised. That is why you Mob in that corner. There maybe 3-4 Jumpers around, just make sure you talk to each other in deciding which jumper dies first or better yet just follow the hot foot technique.
Once both areas are cleared, group up to 1st switch and then fleet your way to 3rd switch.
Everyone
1st crew
2nd crew
The areas I have circled above, are screens which you can leave and still be successful when doing the switches. I tried it twice and it was successful at both attempts. Maybe you can try leaving them out and report back to me.
EDIT:

Here's a new way to mob X Mob. I did this way back when I was trying to ring farming. The aim is to run to the screen above, everyone makes sure they stay at the corner, or at the zOMG beta side. The assigned lurers would then lure everything surrounding X and gather them there. This spot is so much better than the X as it compresses everything to one nice spot, which one makes life easier to mob and two makes it easier to spam wish.
There is another spot i need to show you guys, just haven't got the screenie for it.
Please note that I only did smeb 4 times after the update, so my knowledge on this is pretty lame.
Now the aim of smEB is just the same as sEB, its to be fast. Now there have been several attempts at trying to get it done, but they simply aren't done well enough.
We all know that mobbing in SS and Ledge are a breeze to mob, the only suggestion I'll give is to mob at neck rather than at tail. Why? The tighter the spot, the more effective our AoE rings are. You guys need to learn to be capitalist with your rings.
But with this there is a slight problem, those who try to lure the fluffs to neck may leave behind about 3 fluffs, so I recall. So the person luring must make sure all the fluffs are lured and time isn't wasted trying to attack them.
I'm not sure, but I think you have to kill about 60 animated to lower queens CL, I'm still not sure about this, but that's my estimate
Also if you dare to skip Tobos, please for god sake mob at least 3 screens before going, it makes the trip a bit more safer. Why? Because fleets tends to run out 3 screens before you reach the exit according to my experience.
Anyways when you all make your way to Sealab Compound, I think we can all agree that EB door should be mobbed first. It is the hardest and longest mob to kill. I advise you guys to kill the labtechs, then cycles and then move onto jumpers. There is no point trying to go after jumpers straight since everyone will be hitting and locking onto different enemies. Also you'd be wasting precious stamina.
IMPORTANT: Please make sure you buff up here. It is a lengthy switch to clear, so it is wise to buff up here than in any other area.
Everyone
1st Lurer
2nd Lurer
Always have the 1st lurer go first, they'll take most of the hits from the animated and they'll quickly rejoin with the pack so they could be easily healed. 2nd lurer should lure the rest and group with the others.
Kisame Tip: Have one person in crew to have hot foot. Now when at EB door, you will see that once a majority of the mob has died, the jumpers will be the last survivors. This a moment where everyone is confused and you guys end up hitting different Jumpers. Now my tip is hit the jumpers you guys see the person with hot foot is hitting. This speeds up the killing process and is more organised.
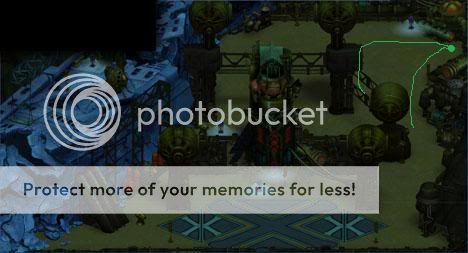
Now after the mob is killed, head to 1st and 2nd switch, spilt the crew up into two. The reason for this is so you can clear the area in one go and then quickly progress to the 3rd switch.
The Green line represents Crew 1, which is essentially a 3 man crew
As you can see above the green line shows where the 1st crew should go to lure the animated. Once luring is done, I advise you to stay at that bottom right hand corner spot. Why? Well its to compress the mob down, so it is easier to mob. Before in my sEB runs I'd make the person who's doing 1st switch dialogue to stand at that spot, since they'd be safe from getting hit from any retreating animated. That spot is a excellent way to mob the animated and I really advise you guys to stay there.
As you can guess the blue line represents the direction the 2nd crew should follow the lure. One person should lure from the area circled and then station at the corner screen, the blue dot. While waiting there the other crew mates should lure the animated surrounding the 2nd switch area and bring them into the corner area.
You'd probably know why I'm asking you to stay at the corner. Some mobbers tend to have their mobs spread out, but I'm a player who plays through efficiency, I could be described as being a efficient mobber. I want to get the mob down fast, while making sure my AoE rings are fully maximised. That is why you Mob in that corner. There maybe 3-4 Jumpers around, just make sure you talk to each other in deciding which jumper dies first or better yet just follow the hot foot technique.
Once both areas are cleared, group up to 1st switch and then fleet your way to 3rd switch.
Everyone
1st crew
2nd crew
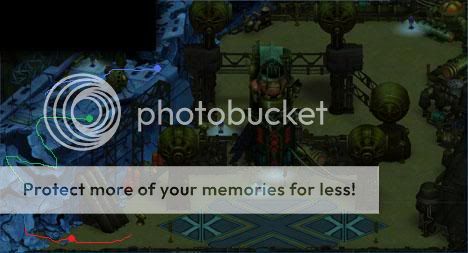
The areas I have circled above, are screens which you can leave and still be successful when doing the switches. I tried it twice and it was successful at both attempts. Maybe you can try leaving them out and report back to me.
EDIT:
Here's a new way to mob X Mob. I did this way back when I was trying to ring farming. The aim is to run to the screen above, everyone makes sure they stay at the corner, or at the zOMG beta side. The assigned lurers would then lure everything surrounding X and gather them there. This spot is so much better than the X as it compresses everything to one nice spot, which one makes life easier to mob and two makes it easier to spam wish.
There is another spot i need to show you guys, just haven't got the screenie for it.
